How to Run Killer Facebook Advertising Campaigns with Ads Manager

In this blog post, we will provide you with a simple yet comprehensive guide to utilizing Facebook Ads Manager to run highly effective advertising campaigns on Facebook and Instagram.
The Meta ads platform is changing every day, but we’ve tried to pull together a comprehensive guide and break it down step by step.
If you are already familiar with Facebook Ads Manager, go ahead and skip to step 2.
Step 1: Set up Business Manager
Technically you don’t have to follow this step, but sharing assets, tracking pixels, and managing access is much easier with a proper business manager account for your business.
Go to business.facebook.com to get started.
Step 2: Familiarize Yourself with Facebook Ads Manager
Facebook Ads Manager is a powerful tool that enables you to accomplish any of the following:
- Create Facebook Ad Campaigns
- Create new Ads and Ad Sets
- Select your target audience
- Manage your Facebook Ad bids
- Track your Facebook Ad performance data
- A/B test your Facebook Ad Campaigns
The easiest way to access your Facebook Ads Manager account is through the URL https://www.facebook.com/ads/manager
Here is a quick overview, but we recommend you spend some time navigating around Ads Manager to get comfortable with the layout.

Becoming familiar with the Ads Manager tool is only half the battle. You will also want to familiarize yourself with some basic marketing concepts to help your Ad Campaigns succeed.
Step 2: Understand the Relevant Marketing Concepts
In an effort to keep things as simple as possible, we have distilled the most relevant marketing concepts for Facebook advertising into 3 categories:
If you are a marketing veteran who is already familiar with all of these concepts, go ahead and skip to step 3.
2.1 – The Marketing Funnel
We will start with the Marketing Funnel. The Funnel is a consumer-focused marketing model used to illustrate the customer journey towards a purchase/donation/subscription.
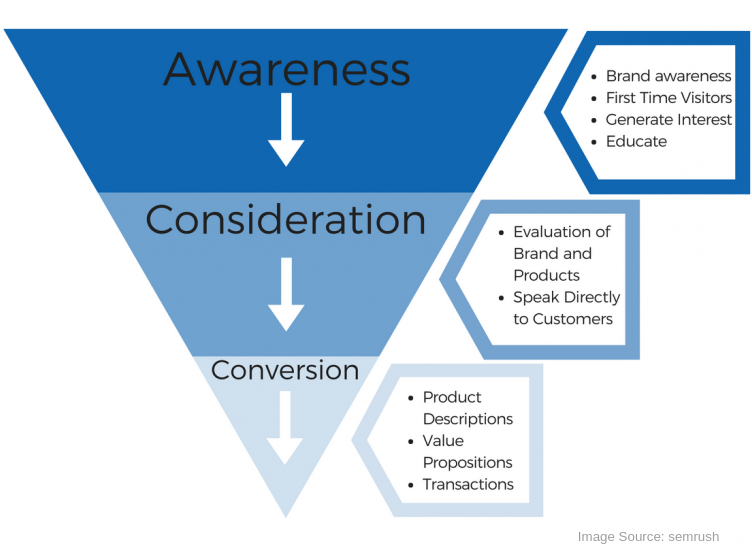
Potential customers begin at the brand awareness stage. This is the broadest segment of the funnel, and we will refer to it as the Top of Funnel or TOFU for short.
Those who make it to the consideration stage become leads. We will refer to this segment as the Middle of Funnel or MOFU.
And finally, a percentage of these leads will reach the conversion stage, which we will call the Bottom of Funnel or BOFU.
Our goal as marketers changes as our target audience moves through the funnel.
At the TOFU, our goal is to engage as many people as possible, generate interest, and educate them about our brand.
In the MOFU, our goal is to re-target our visitors and convert them into leads.
And at the BOFU, our goal is to convert our leads into customers at the highest rates possible.
A successful Facebook Advertising Campaign will utilize different ads to target consumers in all segments of the funnel simultaneously. Some ads will be targeted at the TOFU, some ads will be targeted at the MOFU, and some ads will be targeted at the BOFU.
Thanks to Ads Manager’s pixeling and targeting tools, it is easy to re-target individuals who engaged with your TOFU ads, and follow up with your MOFU ads.
Similarly, you should also re-target individuals who engage with your MOFU ads, and follow up with your BOFU ads.
The amount of your ad budget that you spend on each segment of the funnel may vary, but we would highly recommend utilizing a 60/30/10 split.
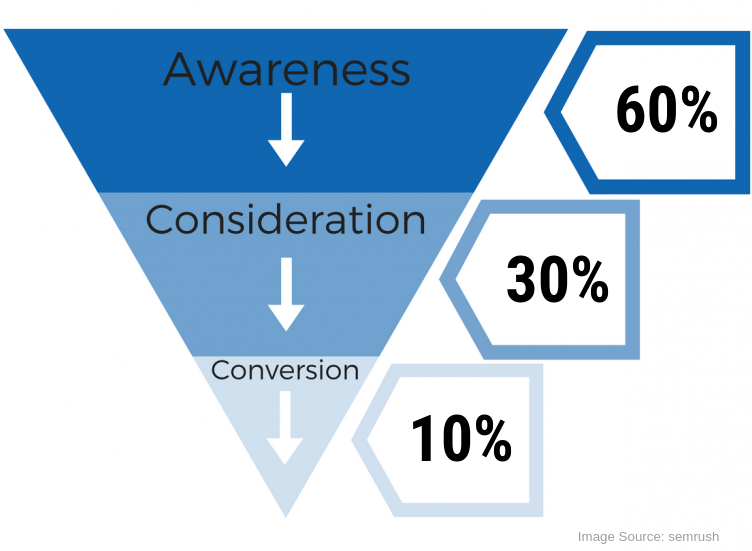
This means that 60% of your Facebook Advertising budget should be utilized on Top of Funnel advertising, increasing your brand awareness.
30% should be spent on Middle of Funnel advertising, converting visitors/engagers into leads.
And 10% should be spent on Bottom of Funnel advertising, converting your leads into customers, and customers into repeat customers.
Following this simple guideline, and making sure that you are targeting all areas of the funnel simultaneously, you will be optimizing your Ad Campaign for success.
2.2 – Using Effective Audience Targeting
Audience targeting can make or break your Facebook Advertising Campaigns. Facebook offers so many targeting options, and deciding where to begin can be overwhelming. We will simplify the process and share some targeting secrets that will help you successfully reach your target audience.
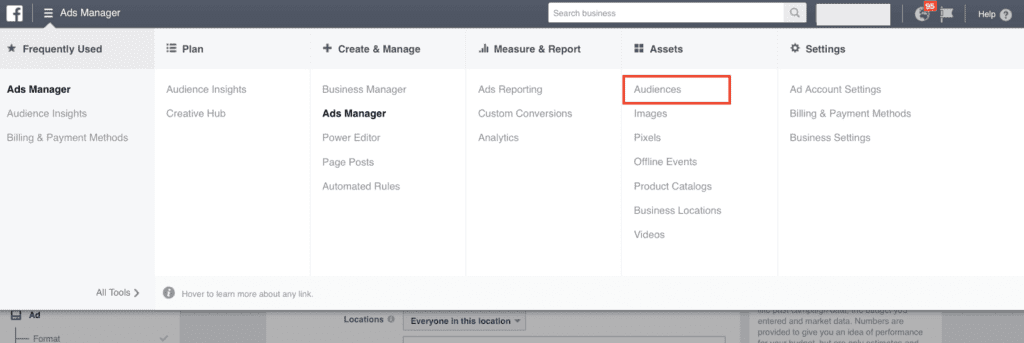
Within Ads Manager, you can view your saved Audiences and create new ones under the “Audiences” tab.
However, before you start exploring all of the options available to you, it can be very beneficial to develop a Buyer Persona.
A Buyer Persona is a semi-fictional representation of your ideal customer. It consists of a collection of the most common traits you find among your current customers or your ideal potential customers.
To develop a Buyer Persona, it is helpful to brainstorm your customer’s needs, demographic info, interests, and behavioural traits.
You can also use Facebook’s Audience Insights tool to analyze the traits of your current customers. This can provide useful information for future targeting, such as relationship status, job title, education level, online purchase behaviour and spending level.
Once you have established your Buyer Persona, you can develop targeted content appropriately, and you can begin to utilize the targeting tools in Ads Manager effectively.
There are 3 main audience types within Ads Manager:
- Saved Audiences
- Custom Audiences
- Lookalike Audiences
Saved Audiences are audiences that you can define by location, age, gender, income level, etc. These audiences can be saved and used again on any future ad campaigns, so it is worthwhile to devote some time to developing effective Saved Audiences.
Setting up location-based and demographic-based audiences is relatively straight forward, but interest-based targeting can be much more nuanced.
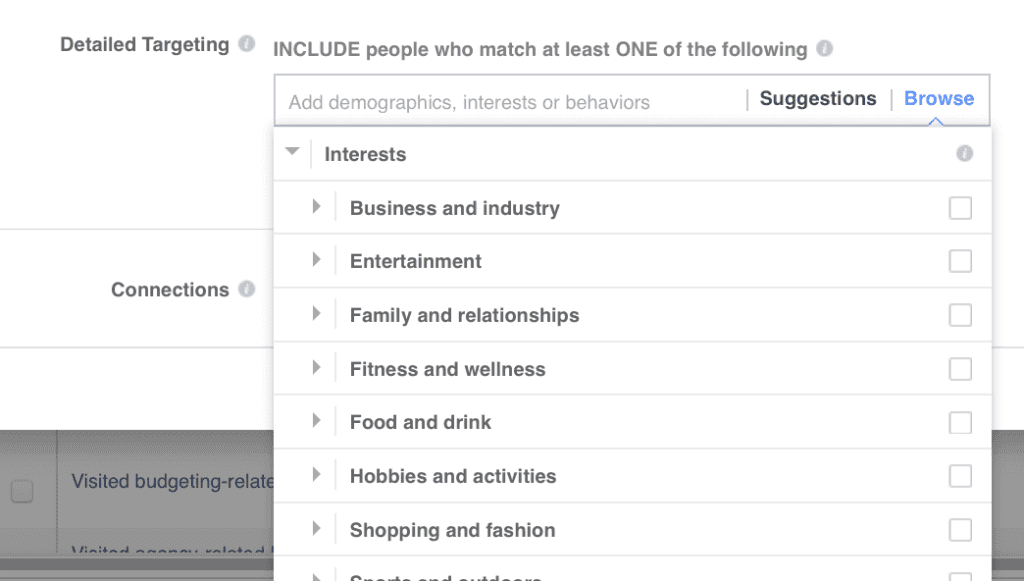
You can browse through the categories offered to you by Facebook, or search for any particular interests in the search bar.
The interests are based on Facebook users’ likes and interests, apps they use, Pages they’ve Liked, and more.
Keep your buyer persona in mind when setting up interest-based targeting, and try not to be too broad.
For example, if you are trying to sell hockey equipment, you could target users interested in “Hockey” but this would be far too broad and inefficient – you would reach a lot of users who don’t actually play hockey and who would not be likely to purchase your product.
Instead you should aim to find a niche interest to target that will be more relevant to people who are actually playing hockey or purchasing equipment. You can do this by selecting “Hockey” as an interest, and then using Facebook’s suggested related interests for ideas.
Facebook suggested “Bauer Hockey,” a hockey equipment company with 2.6 million interested users. It would be much more effective to target your ads to users interested in “Bauer Hockey” than to target the 11.7 million users interested in “Hockey.”
Behaviour-based targeting can also be quite nuanced, and while it is not always necessary, it can be very relevant for some advertisers.
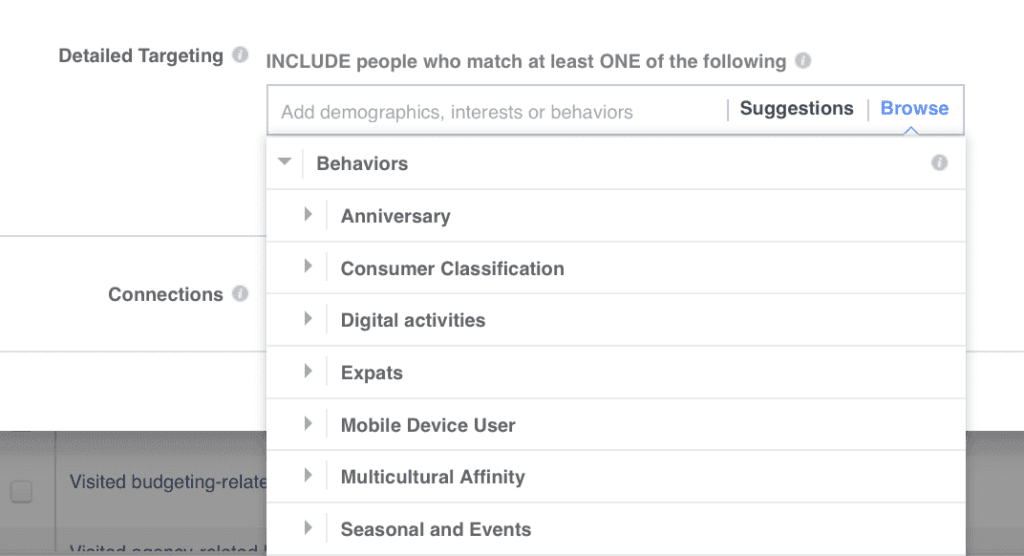
For example, you can target users who have an anniversary coming up in the next 60-90 days. This may not be relevant for most businesses, but if you run a jewelry business this could be extremely relevant to you.
We recommend at least browsing through Behaviours to see if any may be relevant to your business.
In addition to Saved Audiences for your buyer persona, you can also utilize Custom Audiences.
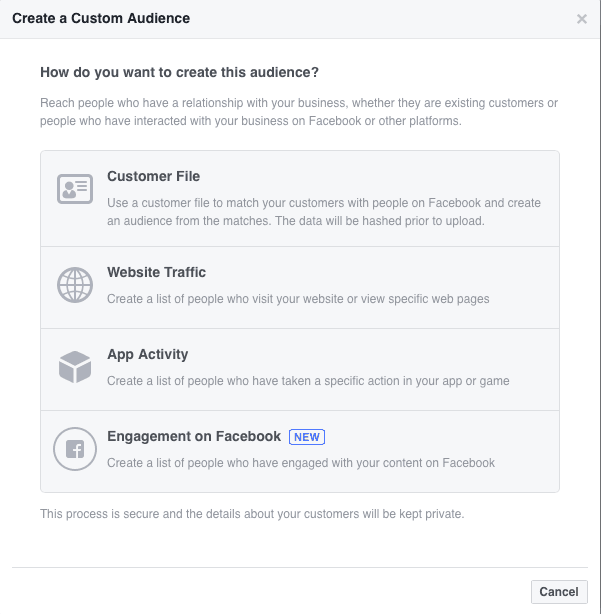
Custom Audiences allow you to re-target past website visitors, individuals who have engaged with your content, or even upload lists of past clients.
This is critical in moving your audience through the Marketing Funnel and getting potential customers to convert.
The first method for setting up a Custom Audience is to use an existing Customer File. Facebook offers a useful guide to prepare your existing customer information for import, which you can access here.
The second method for setting up a Custom Audience is to use Website Traffic. This method uses Facebook Pixel to create a list of users who have already engaged with your website.
This type of audience is extremely useful because it gives you access to users who have already shown interest in you.
To use Facebook Pixel, you must install it first. Once again Facebook offers instructions on how to install Meta Pixel.
Once you have set up your pixel, you can create ads based off Website Traffic.
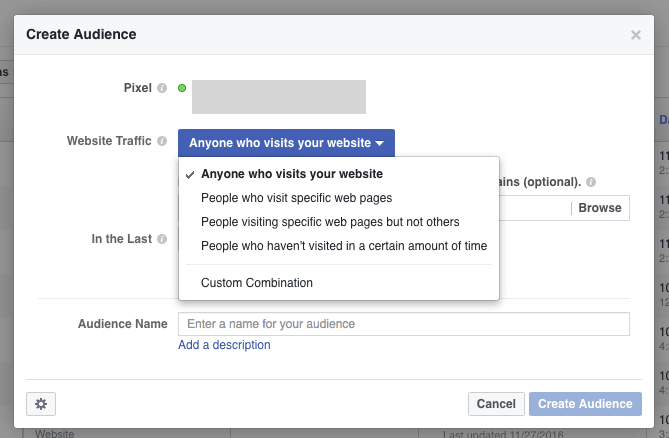
As you can see Facebook offers some interesting options based on user traffic. You can target users who visited specific pages on your website, or people who have not visited in a certain amount of time.
This is a very powerful marketing tool as it can enable you to target past landing page visitors, shopping cart abandoners, past purchasers, people who have visited your pricing page, blog readers, etc.
Custom Audiences can also be created based on App Activity to target individuals using your app. If this is relevant for your business you can find more information from Facebook here.
The final way to create a Custom Audience is through Facebook Engagement.
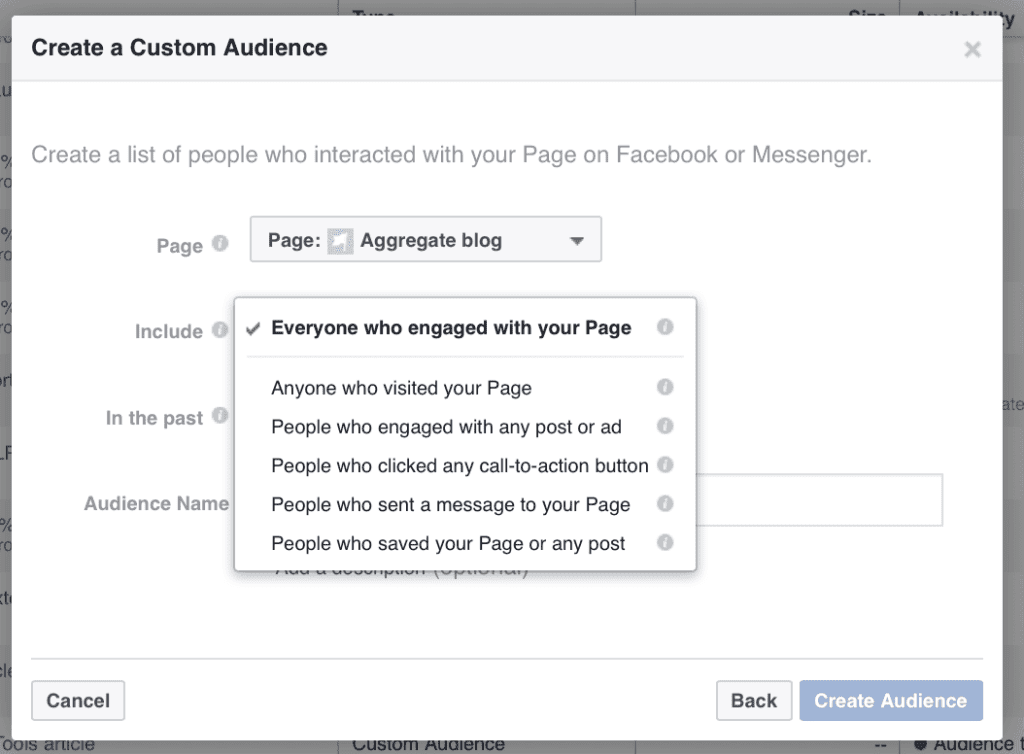
This method gives you access to audiences that have already been engaging with your Facebook page.
Someone who clicked a call-to-action button before is much more likely to do so again.
The third and final Audience Type on Facebook is the Lookalike Audience.
The Lookalike Audience will utilize one of your existing Custom Audiences, and find other Facebook users who are similar to the members of your chosen Custom Audience.

All you have to do with Lookalike Audiences is choose your Custom Audience, select a target country, and select an audience size between 1-10%. If you choose 1%, your ad will target the 1% of users in a given country who are most similar to your chosen Custom Audience.
Lookalike Audiences can be very helpful in finding more users who are similar to your existing consumer base.
With knowledge of the Marketing Funnel, a solid Buyer Persona, and an understanding of Saved Audiences, Custom Audiences, and Lookalike Audiences, you now have all of the tools at your disposal to target your advertisements effectively.
2.3 – Creating Engaging Content
The final piece of the Facebook Advertising puzzle is the content itself – creating engaging content is essential to move users through the Marketing Funnel. Even with perfect user targeting, if your content does not capture attention and inspire engagement, you will not get a return on your Facebook Marketing investment.
The content that you create will vary depending on the nature of your business, your Buyer Persona, and the level of the Marketing Funnel you are targeting.
The first step when creating content is to identify the targeted area of the Marketing Funnel, and the related goal – what do I hope to accomplish with this piece of content?
Am I trying to increase brand awareness, convert users into leads, or convert leads into sales?
Let’s look at examples of BOFU, MOFU, and TOFU ads from sales and marketing software developers HubSpot:

Top of funnel ads are intended to increase brand awareness. You do not need to try to sell anything – the important thing is getting users familiar with seeing your brand and engaging with your content.
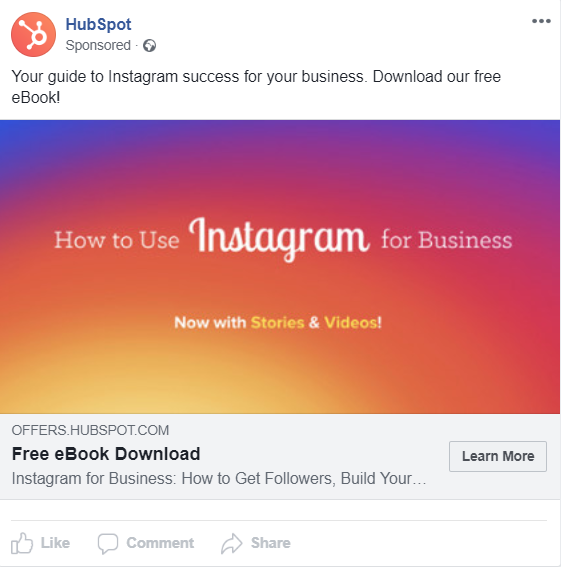
Middle of funnel ads are designed to convert users who are familiar with your brand into leads. Offering free content like an e-book is an excellent middle of funnel strategy to demonstrate your value to a potential customer, and prepare them to enter the bottom of the funnel.
BOFU:

Bottom of funnel ads should be designed for conversion, with a clear call to action. The overall goal for HubSpot’s Facebook Ad Campaign is getting users to create an account and get their free CRM software. Once users sign up, they can be re-targeted with email ads, and prompted to upgrade to a paid software option such as their Marketing Hub.
All of the ads above are simple and effective, with a clear goal in mind, targeting users at different levels of the Marketing Funnel with different types of content.
Once you have identified your goal and target level on the Marketing Funnel, the second step is to decide what type of content you are going to use to accomplish your goal – different types of content work better for accomplishing different goals.
For example, an introduction video may work well for creating brand awareness, but a comparison of your product to the competition may work best for converting a lead into a customer.
After you have chosen the type of content (video, blog post, sign-up ad, etc.), you must create something that stands out and captures the user’s attention. Your content should be on-brand, and MOFU and BOFU ads should have a clear call to action (i.e. “sign up today” or “buy now”).
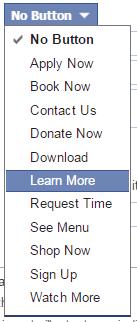
Utilizing Facebook’s “buttons” helps make the call to action clear, and leads to more clicks.
Finally, the job is not finished once the content is created and posted. Facebook makes it easy to analyze what succeeds and what fails – you can use the exact same targeting, and one piece of content may get huge engagement and huge ROI, while another may fail miserably.
Pay attention to the metrics, learn from your successes and failures, and adapt accordingly.
For more in depth information on content creation, including how to set up a content creation calendar, and tools for coming up with fresh content ideas, HubSpot has an excellent content marketing plan.
Step 3: Setting up Your Facebook Ad Campaign Step-by-Step
Now that you are familiar with Facebook Ads Manager, the Marketing Funnel, Audience Targeting, and Content Creation, you are ready to put it all together and set up a great Facebook Ad Campaign.
Your campaign should include at least one advertisement at each level of the Marketing Funnel (or, run 3 separate campaigns simultaneously, for TOFU, MOFU, and BOFU respectively). Remember to utilize the Buyer Persona, Audience Targeting, and Content Creation principles discussed in Step 2.
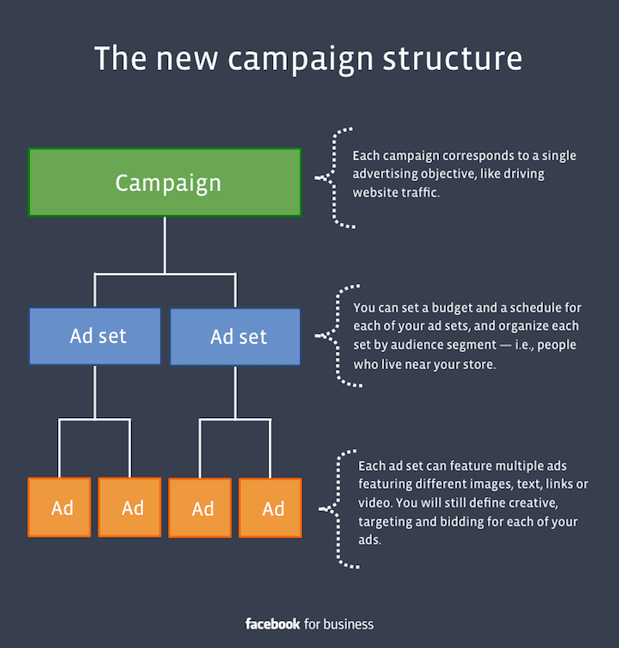
Each Campaign can be broken down into 3 main sections: Campaign, Ad Set, and Ad
To begin, let’s Set up your campaign.
Campaign Set Up
To begin, select your campaign objective.
In Ads Manager your options will look like this:
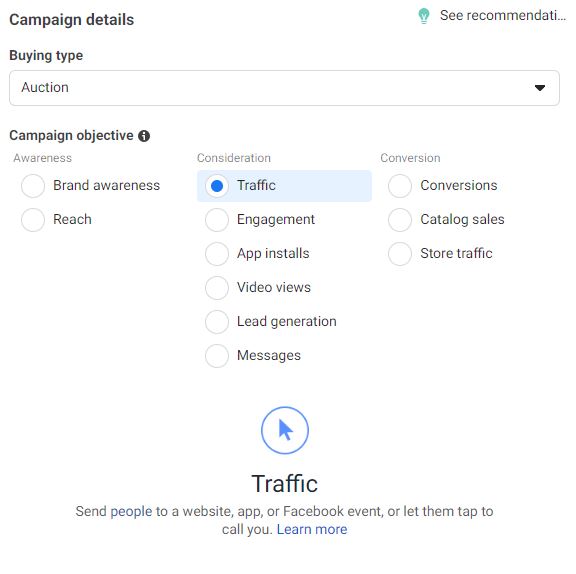
You can see that Facebook has also broken down their options into categories based on the Marketing Funnel. Choose the objective that matches with the goal of your advertising campaign.
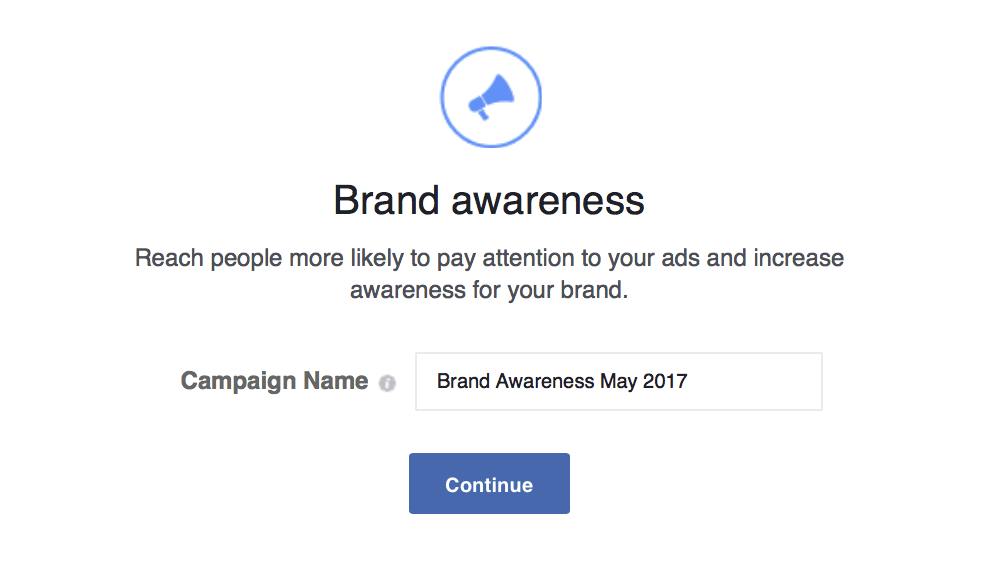
The next step is naming your ad campaign – this name will not be visible to anyone but you, but it should be descriptive and include the date for future reference.
Next, you must choose your target audience. This is where everything you learned about targeting in step 2 becomes essential.
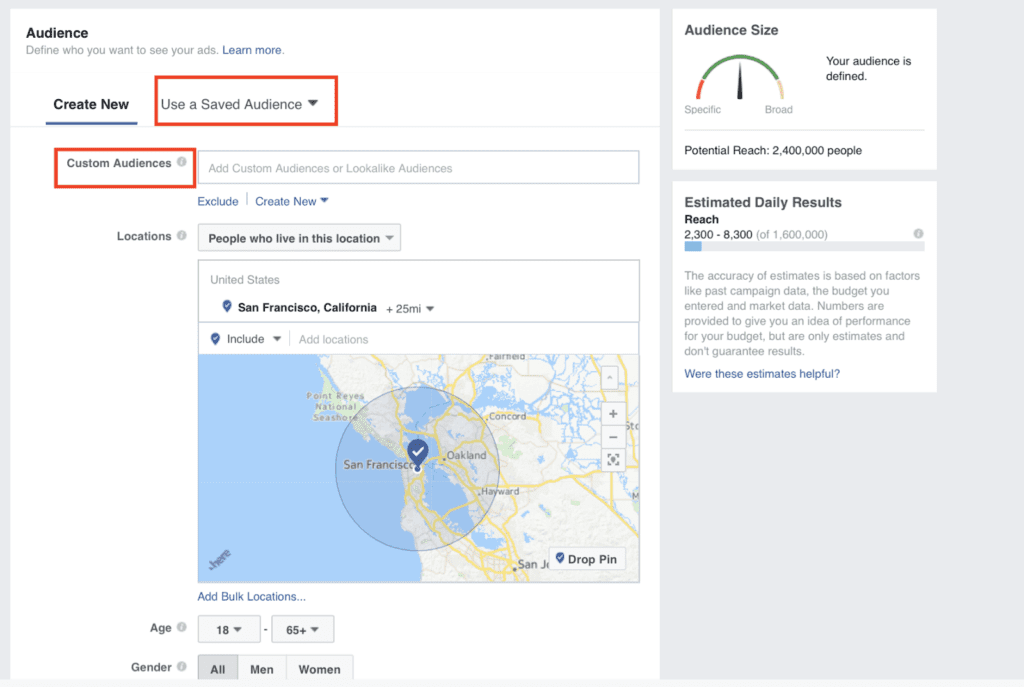
If you have already created a Saved Audience, you can select it now, or you can choose a Custom Audience or Lookalike Audience.
After you have selected your target audience, you must choose your ad placements. These will dictate where exactly your ad will appear.
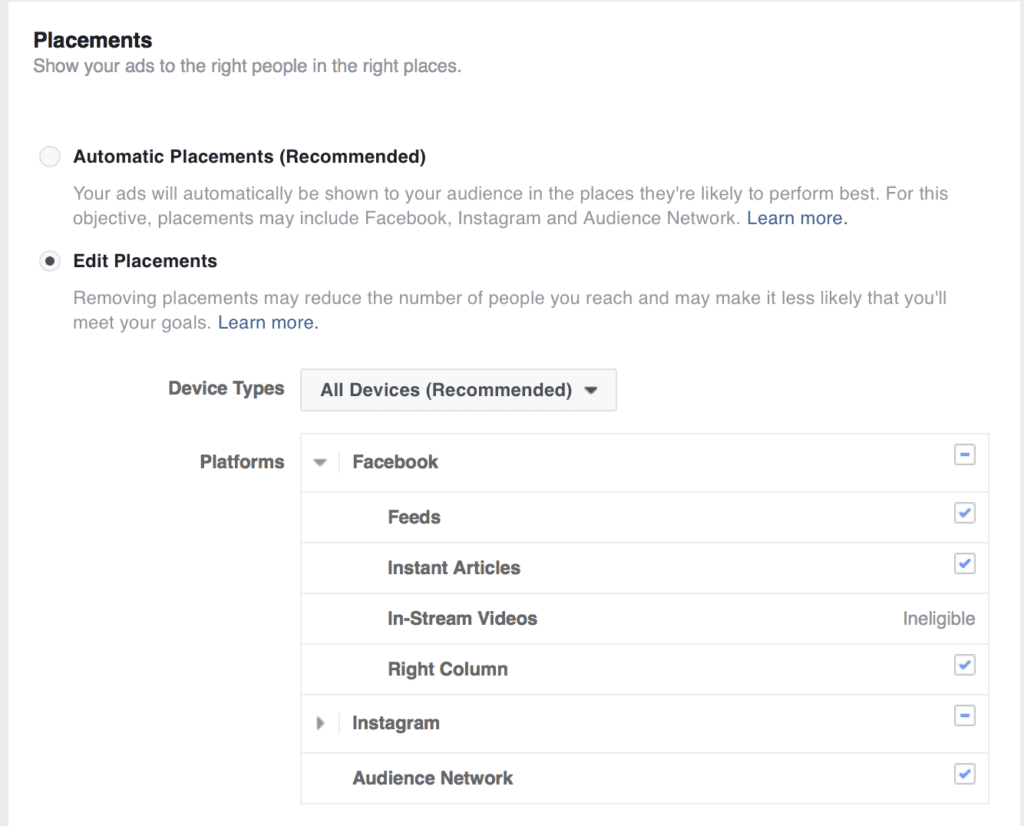
In general, Instagram placements tend to cost more per click, so you may want to deselect Instagram if it is selected by default. It is also important to keep in mind whether or not your content is optimized for mobile.
If it is not, we would recommend deselecting mobile placements for now.
However, a huge amount of Facebook usage takes place on mobile, so we would highly recommend that you optimize your content for mobile. That means, among other things, having square or vertical content, especially video.
After you have selected Ad Placements, the next step is choosing your Ad Budget and Schedule.
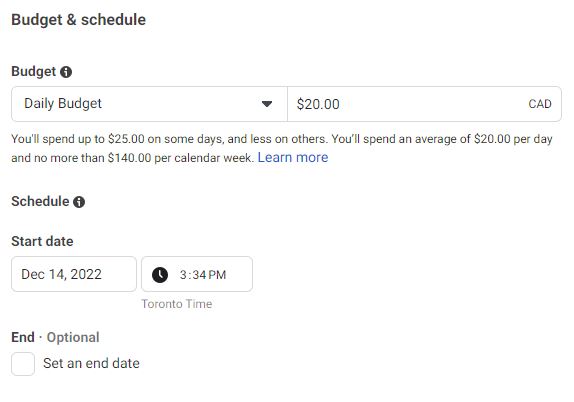
The options are relatively self-explanatory. In general, we would recommend selecting a daily budget, with an unlimited campaign duration. This will enable you to edit the daily budget in the future, and end the campaign whenever you see fit.
Note that you can not change the budget type after the ad set has been created, so make sure you make the right choice when setting up your campaign.
After choosing your budget type, you will select the Optimization for Ad Delivery.
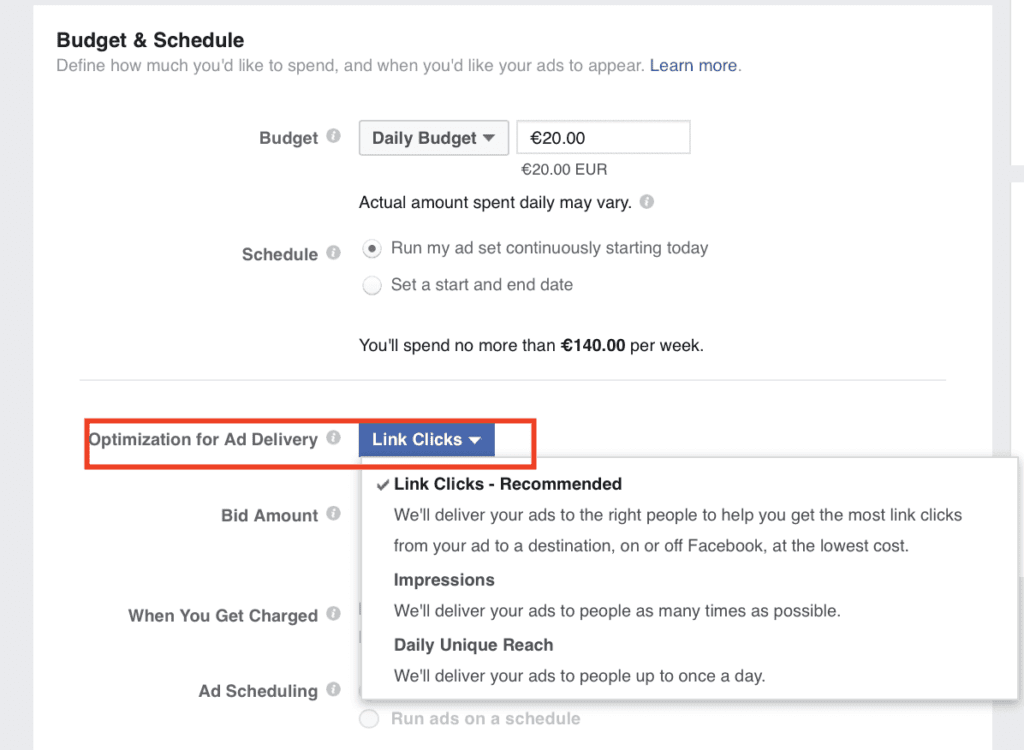
This selection will enable Facebook to optimize your ad for a specific goal (i.e. Link Clicks, Impressions, Daily Unique Reach).
Select the option that aligns with the goal of your advertisement, and move on to your bidding preferences.
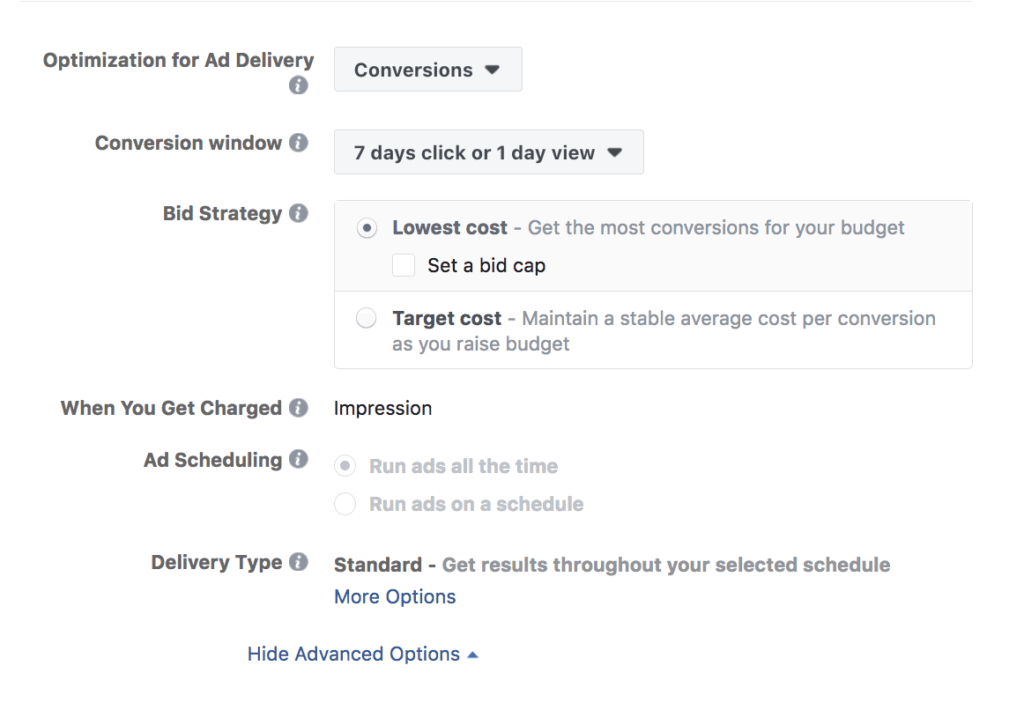
You may need to click “show advanced options” in order to view your bidding options. For beginners, we recommend that you leave the bidding alone and let Facebook optimize it for you.
The bidding system is quite complex and Facebook changes their algorithm regularly. If you would like to learn more you can find an in depth guide to the bidding system here.
The next option available to you is the Ad Scheduling.
This option allows you to determine when your ads will run – if desired you can specify certain days or times of day.
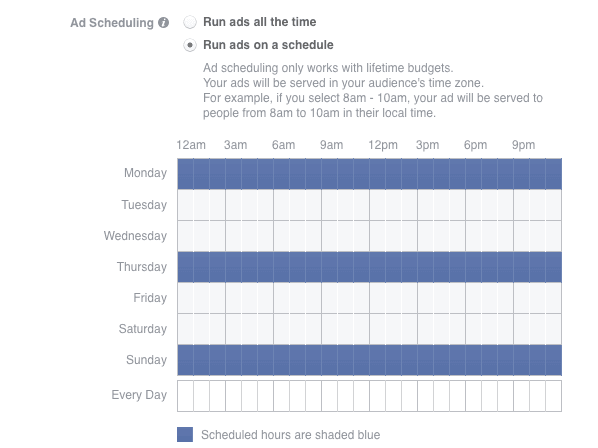
We recommend you begin by scheduling your ads to run all the time.
Once you have run your ads long enough to collect some data, you can view your ad reports to see what days and times work best, and schedule a custom schedule based off of the data.
The final option in the Ad Set section is the Delivery Type.
Here we are provided with two options: Standard Delivery and Accelerated Delivery.
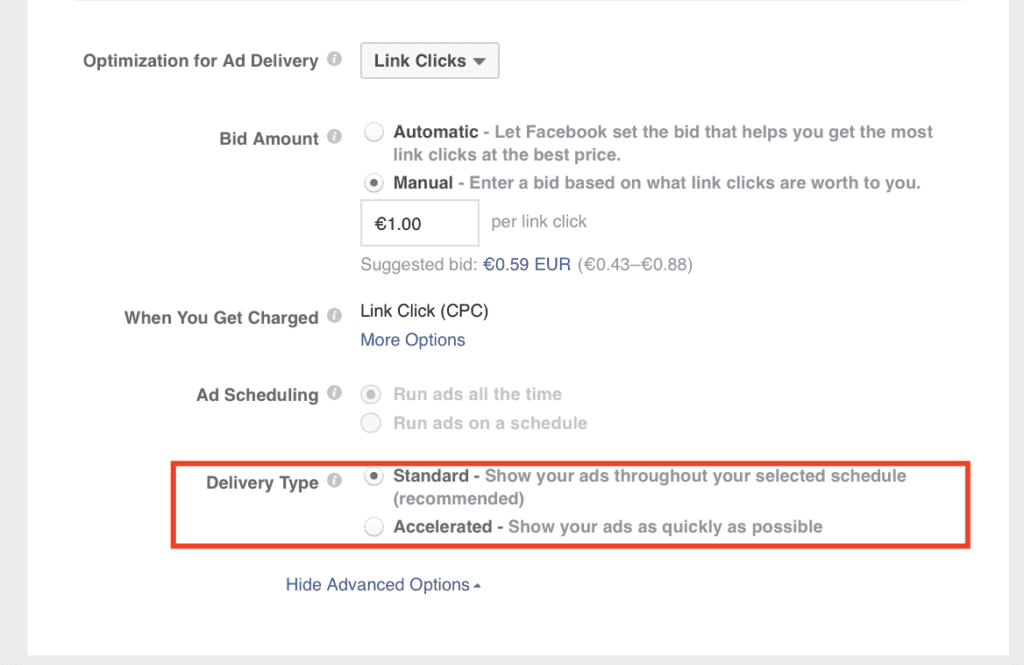
Unless your ad is very time sensitive and needs to be pushed in front of as many people as possible as quickly as possible, we recommend you leave this set to standard in order to minimize cost per click.
Once you have chosen all of your desired settings for the Ad Set, the last step is completing the Ad itself. This is where the creative component comes in.
Here you can create a name for your ad – again, this won’t be visible to users, but be descriptive and include the date for your own future reference.
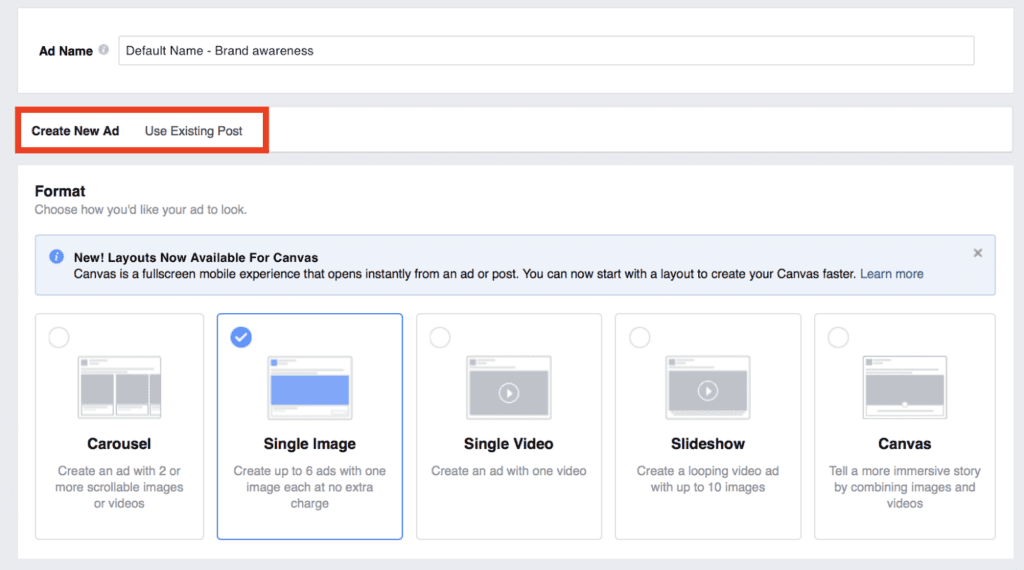
You can also choose if you want to create your ad based off of a pre-existing Facebook post, or start from scratch.
Unless you just happen to have an existing post that would make an excellent advertisement, we recommend starting from scratch, and uploading images/videos from your computer, and filling in the Headline, Ad Copy, etc. as you go.
The most common format choices are a single image or a single video. However the carousel can be effective if you are selling multiple products and want the user to be able to scroll through and view more, and Canvas has some interesting applications on mobile devices.
Once you choose the format type, you will have to choose your image/video.
If you are not already subscribed to a stock-photo library like Adobestock or Shutterstock, make sure you check out Unsplash, where you can download free high quality photos for use in your ads. Just be sure to crop the image to the correct size (1200×628 pixels) to optimize it for Facebook.
We also recommend including a call to action within the image itself. The call to action can be repeated in the Headline and/or with a Call to Action button as well.
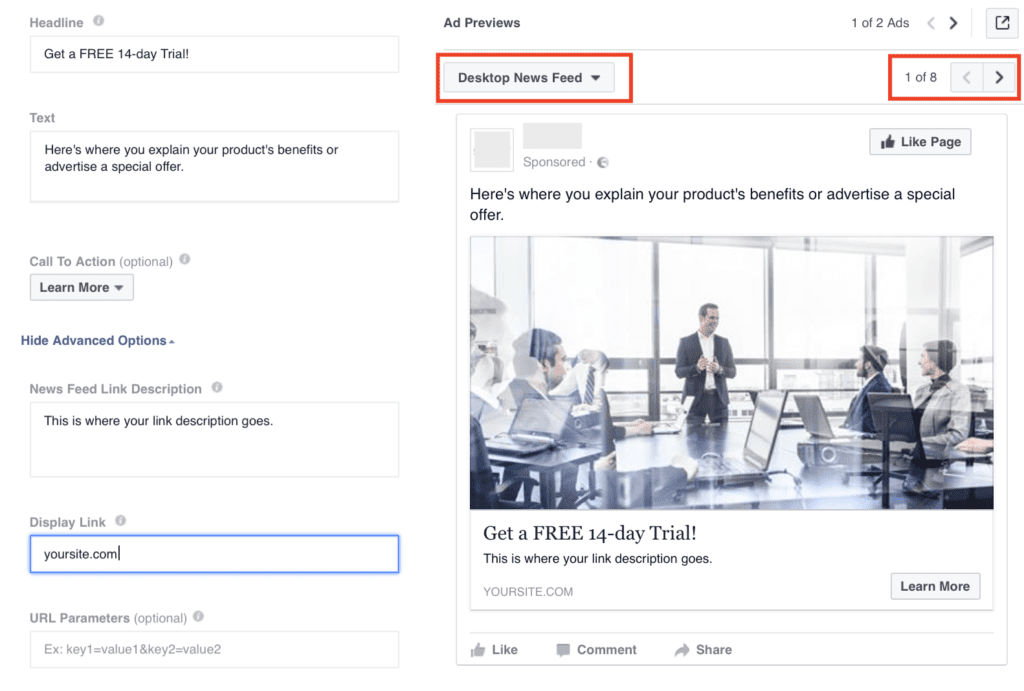
After selecting an image or video, you can fill in your Headline, Ad Text, Display Link, Link Description and Call to Action button.
Be sure to utilize the Ad Previews to see what your ad will look like in different formats.
The text in your ad should be short, concise, and attention grabbing.
This ad from AirBnB provides a good example:
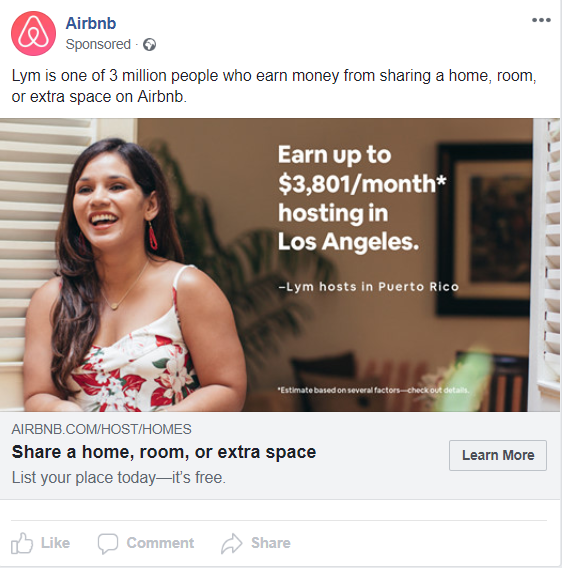
Notice the text within the ad image, the simple, repeated messaging, the use of Facebook’s “Learn More” button, and a message that is sure to capture attention – who wouldn’t like to earn an extra $3,801 per month?
Remember that it takes more than one good ad to make an ad campaign – you will need to repeat this process and create a variety of ads that target different areas of the Marketing Funnel.
Step 4 – Review Performance Metrics, Fine Tune, and Repeat
You now have a solid understanding of how to create a winning Facebook Ad Campaign. But there is always room for improvement. Utilizing Facebook Ads Manager’s built in reporting tools you can quickly and easily see how your ads are performing, and make adjustments as needed.
To access your reports, click on the Account Overview tab, and select Creative Reporting.
Make sure you select the appropriate time frame that you would like to generate a report for. If you are interested in how the campaign has performed since it was created, select Lifetime. If you are more interested in how the campaign is currently performing, select Last 7 Days.
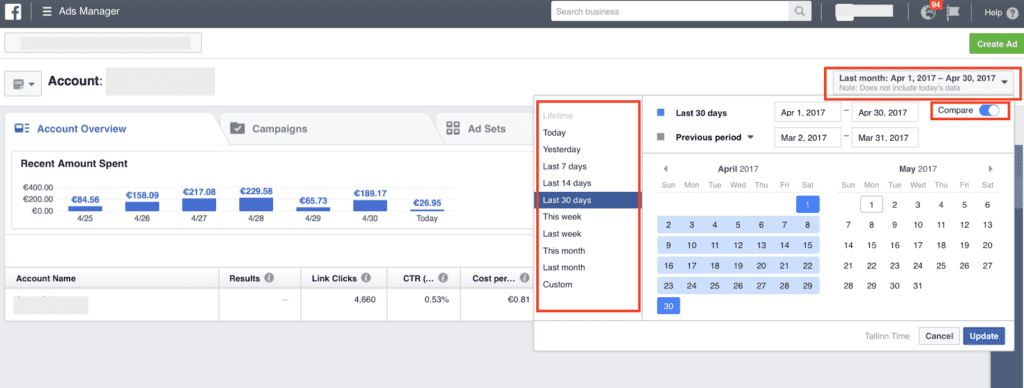
You will now be able to view an overview of your ad campaigns, as well as some key performance metrics such as Link Clicks, Cost per Click, Reach, and Amount Spent.
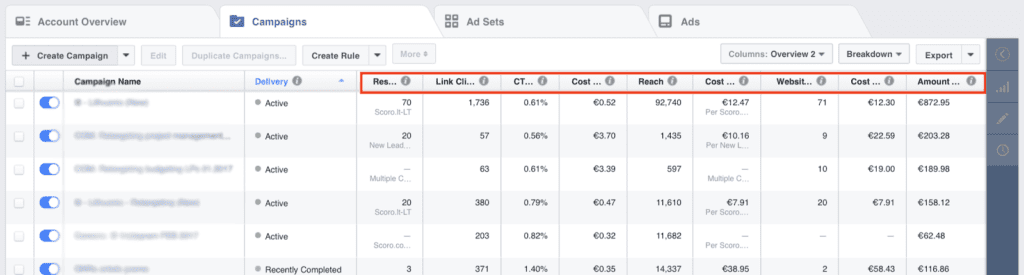
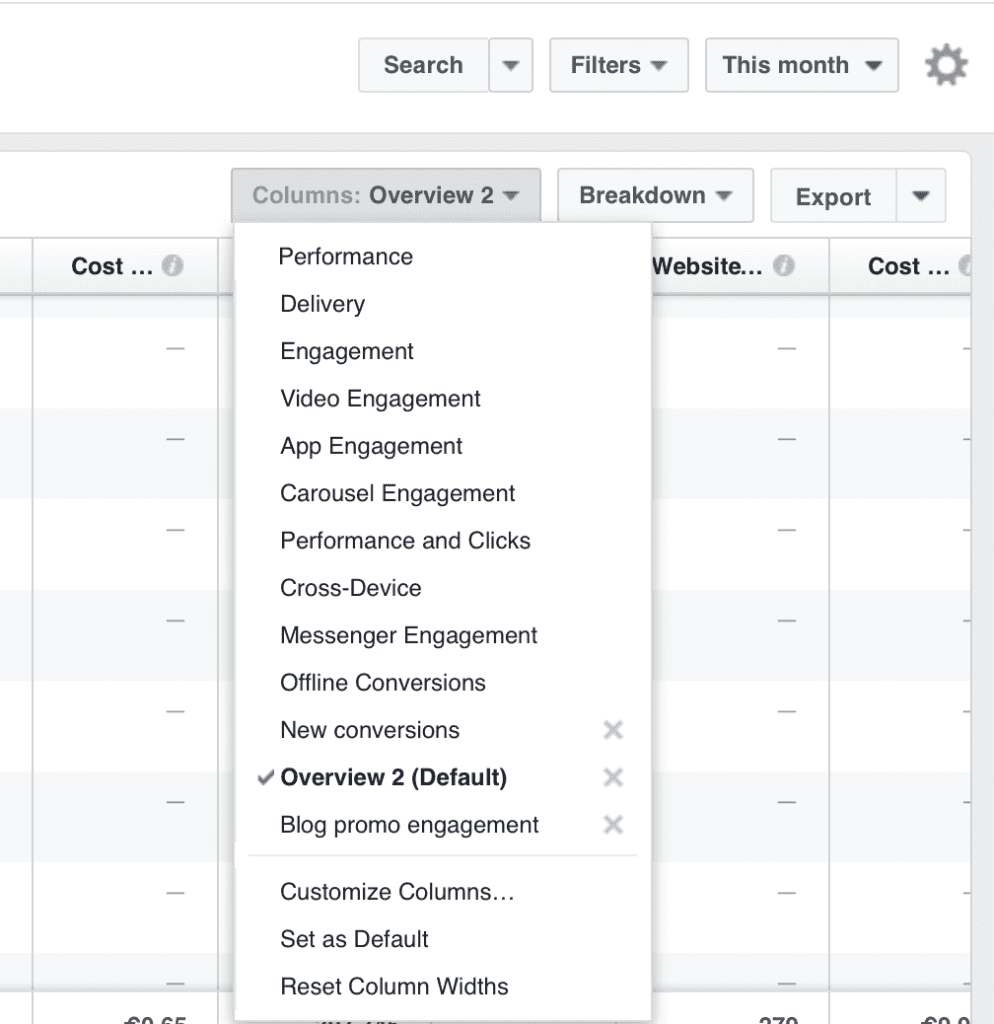
If there are other specific metrics you would like to analyze, you can change the columns using the “Columns” menu.
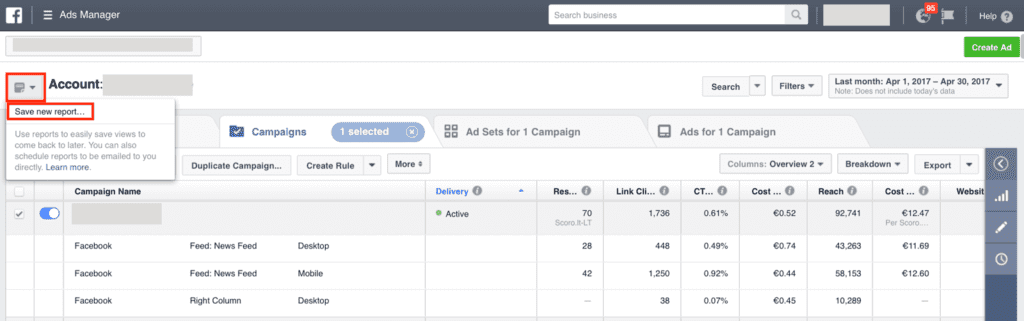
You can also save your report templates and automate an email with a weekly or monthly report using the “Save new report…” option. We would recommend setting this up as a reminder to review your performance metrics regularly and refresh your campaigns when things slow down.
Thanks to these easy to use reporting tools from Facebook, you can easily track which ads perform well and which ones do not. Don’t be afraid to experiment – build upon what works well and cut out what doesn’t. With time and practice and regular review, you will soon be running highly successful Facebook Ad Campaigns, and maximizing your ROI.
We hope you have enjoyed our guide to running killer Facebook Advertising Campaigns with Ads Manager.
If you would like help with your next Facebook Advertising Campaign, or any aspect of your Digital Marketing Strategy, we would love to hear from you! You can schedule a free consultation here.
